Remote Debugging
Enabling this feature of your IoT box will allow remote connections to your IoT box. Generally use to solve technical issue or troubleshooting.
Danger
Do NOT enable this feature if you do not trust the other party as it would give then an administration access on your IoT box which could create security issue in your network. More details in the Security section.
Security
The remote debugging feature is a powerful tool but can cause some security risks.
While the feature is on, it will create an unlisted ngrok tunnel/URL to your IoT box. Anyone with this URL and your IoT password could access it and run any command. This is already an issue in it-self, but it could also be used to pivot to other devices in your network.
Thus, we do recommend to disable this feature while it is not needed to don’t take any risks.
Enable Remote Debugging
Pre-requisite
You need to have a token provided by the person who will connect to your IoT box
The IoT-box homepage should be accessible
Steps
Connect to your IoT box homepage (using the link on the IoT app)
Click the gears icon button on the top right corner of the page to enable debugger mode
Click on the Remote Debug button at the bottom of the page
Caution
The Remote Debug button will only be visible if the IoT box is in debug mode. If you do not see it, you need to enable the debug mode first by clicking on the gears icon button.
The Remote Debuging dialog will open
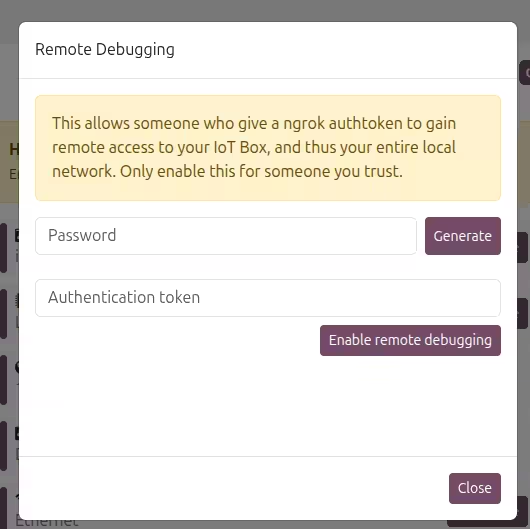
In the “Authentification Token” field, enter the token provided by the person who will connect to your IoT box
Click on the Enable Remote Debugging button
Click the Generate` button which will automatically generate a random password that will appear in the field next to it
Copy the generated password and share it with the person who will connect to your IoT box
Disable Remote Debugging
Shuting down the IoT box will disable the remote debugging feature. You can do so from the IoT-box homepage, or by unplugging the power supply.